How to Create A Draggable Items List in React Native
Published On: 2023-12-20
Posted By: Harish
React Native flatlist does not have default drag and rearrange capabilities. So in this post we will be using an npm package react-native-draggable-flatlist to make our list items draggable.
RNDF package depends on react-native-animated and react-native-gesture-handler packages.
First we will create a new react-native project and install required dependencies.
Create A New Project
Create a new react-native project by using npx. Check documentation for creating a new react native project.
npx react-native@latest init ReactNativeDraggableFlatlistExample
Install react-native-reanimated package
Go to the project folder and install react-native-reanimated npm package using yarn or npm.
npm install react-native-reanimated
#or
yarn add react-native-reanimated
And add 'react-native-reanimated/plugin' to babel.config.js plugins array. If you don't find a plugin's array, add it.
//babel.config.js
module.exports = {
  presets: ['module:@react-native/babel-preset'],
  plugins: [
    ...
    'react-native-reanimated/plugin', //Have to be at last of the array
  ],
};
Install react-native-gesture-handler package
Install react-native-gesture-handler package using yarn or npm.
npm install --save react-native-gesture-handler
#or
yarn add react-native-gesture-handler
After installation, wrap the entry point with <GestureHandlerRootView>. As the name suggests, it has to be the root Higher Order Component (HOC). For newly created projects, its app.tsx.
//app.tsx
import { GestureHandlerRootView } from 'react-native-gesture-handler';

export default function App() {
  return (
    <GestureHandlerRootView style={{ flex: 1 }}>
    ...other content like navigation stack etc...
    </GestureHandlerRootView>
  );
}
You can check the installation process here.
Install react-native-drraggable-flatlist package
Now its time to install the main package, react-native-draggable-flatlist.
npm install --save react-native-draggable-flatlist
#or
yarn add react-native-draggable-flatlist
Don't forget to pod install for iOS.
Creating a list
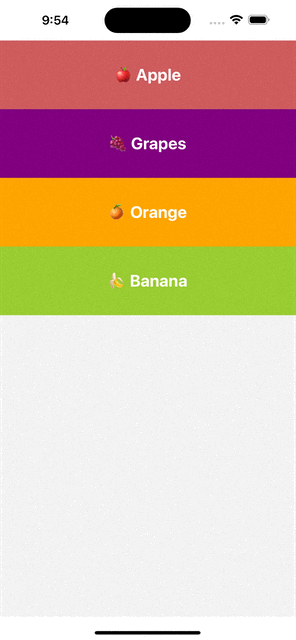
For draggable list, we have to pass list data to <DraggableFlatList> component and update the same list on rearranging. Each item component will be wrapped in <TouchableOpacity> to get press events. Here, we will use the onLongPress event.
Initialize data
We will initialize example data.
//app.tsx
type Item = {
  label: string;
  key: string;
  backgroundColor: string;
};

const initialData: Item[] = [
  {
    label: '🍎 Apple',
    key: 'apple',
    backgroundColor: 'indianred'
  },
  {
    label: '🍊 Orange',
    key: 'orange',
    backgroundColor: 'orange'
  },
  {
    label: '🍌 Banana',
    key: 'banana',
    backgroundColor: 'yellowgreen'
  },
  {
    label: '🍇 Grapes',
    key: 'grapes',
    backgroundColor: 'purple'
  }
]
Create an useState constant to set data and list item compoent to render. useState constant has to be updated with new arranged list to trigger a re-render with new list.
//app.tsx
import { useState } from "react";
import { Text, StyleSheet, TouchableOpacity } from "react-native";

export default function App() {

  const [data, setData] = useState(initialData);

  const renderItem = ({ item, drag, isActive }: RenderItemParams<Item>) => {
    return (
      <ScaleDecorator>
        <TouchableOpacity
          onLongPress={drag}
          disabled={isActive}
          style={[
            styles.rowItem,
            {
              backgroundColor: isActive
                ? "red"
                : item.backgroundColor
            }
          ]}
        >
          <Text style={styles.text}>{item.label}</Text>
        </TouchableOpacity>
      </ScaleDecorator>
    );
  };

  return (
    <GestureHandlerRootView style={{ flex: 1 }}>
      ...content...
    </GestureHandlerRootView>
  );
}

const styles = StyleSheet.create({
  rowItem: {
    flexGrow: 1,
    height: 100,
    alignItems: "center",
    justifyContent: "center",
  },
  text: {
    color: "white",
    fontSize: 24,
    fontWeight: "bold",
    textAlign: "center",
  },
});
renderItem component is wrapped with a <ScaleDecorator> cell decorator to notify the user on selection of an item. Scaledecorator makes selected item to scale, <ShadowDecorator> drops a show around the item on selection and <OpacityDecorator> changes opacity on selection.
Add flatlist component
For the final step, add the <DraggableFlatList> component.
 <DraggableFlatList
      data={data}
      onDragEnd={({ data }) => setData(data)}
      keyExtractor={(item) => item.key}
      renderItem={renderItem}
      containerStyle={[{ backgroundColor: 'pink' }]}
    />
We can set list container styles with containerStyle prop.
This is a vertical list example. If you want to have a draggable horizontal list, wrap the <DraggableFlatList> component inside <View> tag and mention horizontal prop.
//For horizontal list
<View>
  <DraggableFlatList
    horizontal
    data={data}
    onDragEnd={({ data }) => setData(data)}
    keyExtractor={(item) => item.key}
    renderItem={renderItem}
    containerStyle={[{ backgroundColor: 'pink' }]}
  />
</View>
Final code will look like,
//app.tsx
import { useState } from "react";
import { Text, View, StyleSheet, TouchableOpacity } from "react-native";
import DraggableFlatList, {
  RenderItemParams,
  ScaleDecorator,
} from "react-native-draggable-flatlist";

type Item = {
  label: string;
  key: string;
  backgroundColor: string;
};

const initialData: Item[] = [
  {
    label: '🍎 Apple',
    key: 'apple',
    backgroundColor: 'indianred'
  },
  {
    label: '🍊 Orange',
    key: 'orange',
    backgroundColor: 'orange'
  },
  {
    label: '🍌 Banana',
    key: 'banana',
    backgroundColor: 'yellowgreen'
  },
  {
    label: '🍇 Grapes',
    key: 'grapes',
    backgroundColor: 'purple'
  },

]

export default function App() {

  const [data, setData] = useState(initialData);

  const renderItem = ({ item, drag, isActive }: RenderItemParams<Item>) => {
    return (
      <ScaleDecorator>
        <TouchableOpacity
          onLongPress={drag}
          disabled={isActive}
          style={[
            styles.rowItem,
            {
              backgroundColor: isActive
                ? "red"
                : item.backgroundColor
            }
          ]}
        >
          <Text style={styles.text}>{item.label}</Text>
        </TouchableOpacity>
      </ScaleDecorator>
    );
  };

  return (
    <GestureHandlerRootView style={{ flex: 1 }}>
      <DraggableFlatList
        data={data}
        onDragEnd={({ data }) => setData(data)}
        keyExtractor={(item) => item.key}
        renderItem={renderItem}
        containerStyle={[{ backgroundColor: 'pink' }]}
      />
    </GestureHandlerRootView>
  );
}

const styles = StyleSheet.create({
  rowItem: {
    flexGrow: 1,
    height: 100,
    alignItems: "center",
    justifyContent: "center",
  },
  text: {
    color: "white",
    fontSize: 24,
    fontWeight: "bold",
    textAlign: "center",
  },
});
Related Posts
 Get ScrollView Content Size in React Native
 Masonry List in React Native
 SectionList in React Native
 Stop Scrolling at Regular Intervals in React Native
 Cell Separator in VirtualizedList
 Get Viewable List Items in React Native
 Scroll Programmatically in a FlatList
 Header and Footer for React Native FlatList
 Pull down to Refresh FlatList