What is Keyboard.scheduleLayoutAnimation() Method?
Published On: 2024-02-28
Posted By: Harish
Sometimes we need simple animations for views in our app. We can use React Native Animation api for animating a view or a component.
But if you are already using the Keyboard module , then you can use the Keyboard.scheduleLayoutAnimation() method to animate views. This method is just a wrapper with LayoutAnimation.configureNext method implemention.
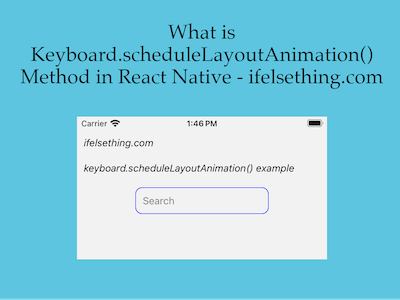
To understand this, we will create a simple search text input animation which expands with the keyboard.
Create A New Project
Create a new react-native project by using npx. Check documentation for creating a new react native project.
npx react-native@latest init KeyboardRN
Import Required Components and Modules
We need to import a Keyboard module, a TextInput for search and Pressable to wrap the text input for closing the keyboard when clicked outside as we discussed in our post.
//app.tsx
import {
  View,
  StyleSheet,
  TextInput,
  Pressable,
  Keyboard
} from "react-native";

...
<Pressable style={styles.container}>
  <TextInput
    style={styles.input}
    keyboardType='default'
    returnKeyType='search'
    placeholder="Search"
    placeholderTextColor='gray'
  />
</Pressable>
...
Now, we want to close the opened keyboard when clicked outside of the text input. So, we use the Keyboard.dismiss() method to dismiss the keyboard inside the onPress callback of the Pressable component.
Our example implementation is to expand the search box when the keyboard is opened and to shrink when the keyboard is closed. So, we will add basic input style and another style which conditionally applies to text input based on the keyboard state.
To get the state of the keyboard, we will create a state variable isKeyboardOpen using the useState hook. This is a boolean which stores true or false based on the keyboard state.
Use this state to conditionally apply or remove style to animate search input.
...

const [isKeyboardOpen, setIsKeyboardOpen] = useState<boolean>(false);

...

<Pressable
  onPress={() => {
    Keyboard.dismiss();
  }}
>
<TextInput
  style={[
    styles.input,
    isKeyboardOpen && styles.after_input
  ]}
  ...
/>
</Pressable>

...
We need to know when the keyboard is opening or closing to animate our text input. We already know that the keyboard will close when tapped outside because of Pressable onPress callback. And with text input's onSubmitEditing callback, we will get to know when the keyboard's search/return button is tapped. So, set the state to false in both Pressable's onPress callback and TextInput's onSubmitEditing callback.
Now, by using text input's onFocus callback, we will know when text input gets focused which results in showing the keyboard. So add onFocus callback and set isKeyboardOpen value to true.
...

<Pressable
  onPress={() => {
    setIsKeyboardOpen(false);
    Keyboard.dismiss();
  }}
>
<TextInput
  ...
  ...
  onFocus={() => {
    setIsKeyboardOpen(true);
  }}
  onSubmitEditing={() => {
    setIsKeyboardOpen(false);
  }}
/>
</Pressable>

...
If we run the app,
#for Android
npx react-native run-android

#for ios
npx react-native run-ios
We will get results similar like below gif,
As you can see that search input gets expanded or shrunken immediately without any animation.
Now to animate that, we will use the Keyboard.scheduleLayoutAnimation() method. As we know that this method is a wrapper of react native animation api's createNext method, which implements on next re-render. In our case, re-render happens because we are updating the state value to true or false on opening or closing of the keyboard.
Keyboard.scheduleLayoutAnimation() takes the KeyboardEvent type. And in that, we need to pass duration and easing as main values, other onEndCoordinates can be ignored.
Create a scheduleLayoutAnimation named method with Keyboard.scheduleLayoutAnimation() implementation and add this method at each place where we are updating the keyboard state value.
import {
  ...
  Keyboard,
  KeyboardEventEasing
} from "react-native";

type KeyboardAnimationEvent = {
  duration: number,
  easing: KeyboardEventEasing
};

...

const scheduleLayoutAnimation = (duration: number) => {
  const anim: KeyboardAnimationEvent = {
    duration: duration,
    easing: 'linear'
  };
  Keyboard.scheduleLayoutAnimation(anim);
};
  ...
<Pressable
  onPress={() => {
    scheduleLayoutAnimation(250);
    setIsKeyboardOpen(false);
    Keyboard.dismiss();
  }}
>
<TextInput
  ...
  ...
  onFocus={() => {
    scheduleLayoutAnimation(250);
    setIsKeyboardOpen(true);
  }}
  onSubmitEditing={() => {
    scheduleLayoutAnimation(250);
    setIsKeyboardOpen(false);
  }}
/>
</Pressable>

...
As animation happens after a re-render, make sure that animation schedule method is implemented before updating the state value.
If we run the app now, we get the below result.
Animation works perfectly for iOS devices, but for android devices we have to enable experimental layout animation property to work like below,
import {
  ...
  Platform,
  UIManager
} from "react-native";

if (
  Platform.OS === 'android' &&
  UIManager.setLayoutAnimationEnabledExperimental
) {
  UIManager.setLayoutAnimationEnabledExperimental(true);
}

...

export const App = () => {

...
Please note that Keyboard's scheduleLayoutAnimation method only accepts KeyboardEventEasing type which does not have spring animation type and other props. But this method is a quick way to add an animation if the Keyboard module is used.
We can also use keyboardWillShow and keyboardWillHide events to get the state before the keyboard event. But these only work for apple devices not for android devices. So I haven’t used that implementation in this post. If you are only focusing on iOS devices, you can go with listener event methods too.
Similar implementation with LayoutAnimation module can be seen in below complete code.
import { useState } from "react";
import {
  View,
  Text,
  StyleSheet,
  TextInput,
  Keyboard,
  Platform,
  LayoutAnimation,
  UIManager,
  Pressable,
  KeyboardEventEasing
} from "react-native";

type KeyboardAnimationEvent = {
  duration: number,
  easing: KeyboardEventEasing
};

if (
  Platform.OS === 'android' &&
  UIManager.setLayoutAnimationEnabledExperimental
) {
  UIManager.setLayoutAnimationEnabledExperimental(true);
}

export const KeyboardAnimation = () => {
  const [isKeyboardOpen, setIsKeyboardOpen] = useState<boolean>(false);
  const scheduleLayoutAnimation = (duration: number) => {
    const anim: KeyboardAnimationEvent = {
      duration: duration,
      easing: 'linear'
    };
    Keyboard.scheduleLayoutAnimation(anim);
  };

  // This method is a similar implementation like Keyboard.scheduleLayoutAnimation method
  // using LayoutAnimation module
  const animationUsingLayoutAnimation = (duration: number) => {
    LayoutAnimation.configureNext({
      duration: duration,
      update: { type: 'linear' },
    });
  };

  return (
    <View style={styles.container}>
      <Pressable
        style={styles.container}
        onPress={() => {
          scheduleLayoutAnimation(250);
          //animationUsingLayoutAnimation(250);
          setIsKeyboardOpen(false);
          Keyboard.dismiss();
        }}>
        <Text style={styles.text}>
          ifelsething.com
        </Text>
        <Text style={styles.text}>
          keyboard.scheduleLayoutAnimation() example
        </Text>
        <TextInput
          style={[
            styles.input,
            isKeyboardOpen && styles.after_input
          ]}
          keyboardType='default'
          returnKeyType='search'
          placeholder="Search"
          placeholderTextColor='gray'
          onFocus={() => {
            scheduleLayoutAnimation(250);
            //animationUsingLayoutAnimation(250);
            setIsKeyboardOpen(true);
          }}
          onSubmitEditing={() => {
            //animationUsingLayoutAnimation(250);
            scheduleLayoutAnimation(250);
            setIsKeyboardOpen(false);
          }}
        />
      </Pressable>
    </View>
  );
}

const styles = StyleSheet.create({
  container: {
    flex: 1,
    margin: 10,
    gap: 20,
  },
  input: {
    borderColor: 'blue',
    borderWidth: 1,
    borderRadius: 10,
    padding: 10,
    fontSize: 15,
    color: 'black',
    width: 200,
    alignSelf: 'center',
  },
  after_input: {
    width: '100%'
  },
  text: {
    fontSize: 15,
    color: 'black',
    fontStyle: 'italic'
  },
});
Related Posts
 Get Content Scroll Position Inside React Native TextInput
 Default Value and Value of React Native TextInput
 How to Focus on React Native TextInput using useRef Hook?
- Get Event Before Keyboard Opening or Closing in React Native
- Hide Keyboard on Scroll in React Native
 Disable Copy/Paste in React Native Text Input
- What is AllowFontScaling Prop in React Native?
 Icon Inside React Native Text Input
- Hide React Native Keyboard with Floating Done Button